Tuesday, 11 January 2011
nCloth test
I was asked to do nCloth for our animation seeing as I had some experience with it. We wanted the stall to move a little in the wind so that not everything was static. I tried adding wind to my original stall but the cloth just blew off the frame >.<
I tried constraining it to the frame but it didn't look right so I decided to change the cloth all together.
Instead of having one single piece of cloth I used 4 separate bits and constrained them to the frame, I then added the wind tolerance and changed it a bit for the other side so that the cloth didn't wave in the wind exactly the same each side and added a bit of variety to it.
I had to do a quick bath render of my stall because my playblast camera has gone all funny and I haven't got a clue how to fix it and I didn't have time to worry about it because the stall was needed.
Monday, 10 January 2011
More texturing


This is a rendered image of my house to test the bump map and diffuse map. Unfortunately my Mental Ray decided to be stupid and not work so I rendered this using the Maya software. I'll try and get my mental ray working again hopefully and I can get a better picture up.
Texturing, Texturing,Texturing
Here are the textures for the files
 This is my barrel UV map I made, I found a really good wooden plank file on Google so I didn't change it much I just tiled it a bit so that it was longer and would rap around the barrel. The rusted metal I found a rather small texture then had to make it longer in Photoshop and make it so that it would tile and you didn't see a seam.
 This is the chimney UV map I used the same texture that I did for the roof, I just changed the colour of it to give a little variety to the roof so it wasn't all one colour.
 This is the UV map for the house. It too aaaaaaaaaaages to colour, I had must have found the smallest wood texture ever! I had to make sure the wood grain was going the right way then there were loads of gaps. Thus was just a pain in the arse to texture and I spent most of one day doing it. it doesn't even look like it would take that long! But it did!
 This is the UV map for the wheel barrow, this is the third wood texture I used for it. This wood I was most happy with because the resolution was high enough that it didn't stretch when I applied the texture.


This is the wheel texture for the wheelbarrow, I made it separate from the wheelbarrow its self to help with animating.
Tuesday, 4 January 2011
Modelling, Modelling, Modelling
So we've been busy modelling a lot lately.We decided that we were all going to make a house each to fill our street, and then make additional props and items to put inside or environment.

 This is my basic house. I only did two levels to add a bit of variety to our street, I did a simple design which should help texturing. It should also help me to practice texturing seeing as I've never done it before.
 This is the wheel barrow that the Rat runs through at the beginning of our sequence. This took me a while to model as there were many different versions of wooden wheelbarrows, but in the end I settled for this design as I found more reference images on it to help me make it.
 A simple barrel I made to put in our street so that it didnt look too bare.
 This the frame of my market stall before I put the canvas top on. I ended up adding two extra bars so the nCloth sat on it properly. I got reference for this stall from a few images I'd seen and from Fable 3.

 Two veiws of my textured stall, with nCloth banner. I ended up constraining the cloth of the wooden frame, so that it didn't fall off.
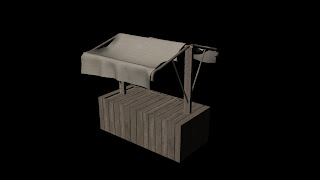 I did a little test render of my market stall, after me testing some textures. It came out better than I expected, especially the cloth.


Monday, 29 November 2010
Epic Rat

Dominique did a storyboard which can be found at http://www.epicdom.wordpress.com/
With us animating from the rats P.O.V theres a chance we would see his front legs and nose whilst he was walking and running about.
This concept can be seen in the game Mirrors Edge, it is played in first person, the main character, Faith, runs from building to building. we see her arms and legs wen she runs.
The rat is also very small so everything will be bigger to him, a few games have tried this theme, like in Zelda and the Minish Cap, but also I remember a section in a game called OKAMI. Where the main character, Amaterasu, gets "hammered" and shrunk to help save the emperor in the Imperial palace.
Finally whilst talking about our rat climbing and jumping around I couldnt help but think about Assassins Creed. Its got nothing to do with me currently playing Assassins Creed: Brotherhood. Honest ^_^
ahem...anyway, so yeh Assassins Creed came to mind with all the parkour and jumping about the buldings, which was out initial idea.
Tuesday, 23 November 2010
Project Brief - From Group Blog
Project Brief
For this project you will be working in teams of four of five students. You will all be working towards a final collaborative short film but will have the opportunity to fulfil clear and separate roles within the team.
- You will be working to create an animated environment
- You will be collaborating with the other animators in your team, but research, and your drawn responses to that research.
- Your research will form the starting point for your work.
This environment will be modelled in 3D, UV mapped, textured, and lit based upon the research of materials, architectural and aesthetic motifs, in order to create a visually consistent and coherent digital environment that will contain animated elements as well as providing an arena to support animation and interaction by characters.
Your environments by virtue of their virtuality are unreal, they will be designed from a starting point of real world research and drawing. You will be expected to provide visual and contextual evidence to support the development of your designs. This research will consist of practical site visits such as the drawing trips to London based venues and associated drawing and photography, as well as academic research via the web and the LRC.
This environment must demonstrate integral animation, it could be mechanical such as machinery, doors, windows, windmills etc, or it could be more organic, and atmospheric, such as the effects of wind on plants, weather conditions, etc. It could be a much more long term animation to show the effect of years passing, rather than minutes. For those of you who can focus upon contextualising the designed environment by populating it with characters using that environment, it may be that the environment is being used in an unintended or unexpected way that has evolved through public interaction with the space.
Animations- Changes over time
- Changes in weather or lighting
- Changes in use of the environment
Visual Aesthetic- A historical period
- An artistic movement
- A geographic or cultural idiom
Blogged design journal is needed.
Things to focus on
-Understand how lighting and colour affect the appearance and mood of an environment.
-Reflection upon, and analysis of, individual performance in a group context.
- Analysis and replication of a real environment of implementation of a designed environment using 3D visualisation software.
-Build a computer generated environment, using modelling texturing, lighting and character interaction to a consistent visual aesthetic.
-Contribute successfully to a collaborative visual aesthetic.
Assessment criteria
- Evidence of the identification and analysis of the aspects of colour, shape and light that contribute to the successful simulation of a particular environment.
Colour - Self explanatory. Why are the colours we're using there in the first place? What relevance do they have to the scene. What effects do they have on the environment, as well as the mood and atmosphere of the environment. How will colour help us to convey specific mood changes / atmospheric effects as well as how it could be used to indirectly link symbolism.
- Evidence of reflection on the student’s personal contribution to the project.
GUYS. SPECIFICALLY AS THIS SAYS. ^^^^^^^^^^^^^^^^^^ INDIVIDUAL CONTRIBUTION. MAKE SURE EVERYONE IS AWARE OF WHAT THEY CONTRIBUTE TOWARDS THE GROUP AS IT WILL CONTRIBUTE TOWARDS YOUR FINAL GRADE. BEING SAID, DO NOT TRY TO STEAL OR CLAIM SHARED IDEAS AS ONES OWN. THIS IS AN ASSESSMENT CRITERIA!
- The degree to which the CGI environment represents a successful replication of a real environment or implantation of a designed environment.
How awesome is the final project going to be? We will be sort of replicating a real place so it should have a feel of the place we're going to replicate. How will that actually affect our final outcome? How well is this going to be pulled off? What is the final finished detail of the project going to be?
- The consistency of the styling of the environment.
How correct is the environment that we're making? Remember, no mindfucks. Make sure that all this stuff has / currently exists, or is at the VERY least extremely feasible to create. How well does this fit into the theme of what we're doing?
- The degree to which the lighting of the environment is appropriate.
What is the purpose of light? Both literally and how it affects an environment / mood of a character / environment. How can we use light to correctly convey various viewpoints of the audience? How can we use light to portray a sense of isolation / suspense / power / beauty?
- The degree to which the environment is used to successfully demonstrate appropriate animation.
What is appropriate animation? Simply put, neccessary animation. Why animate anything that the camera is not going to see? Why make a bird do a backflip followed by a running jump if the original intention was for it to just fly away? Random? Yes, but there are contexts for these things. It's all appropriate if it fits with what is required.
Rochester Photos


Subscribe to:
Posts (Atom)